Apply Tools Pane: Overview
Tools (such as Fringes, Globals, Groups, Locations, and Sets) are items added to and used in your budget to help calculate your totals, organize your data, and keep costs consistent from budget to budget. Tools are neatly organized into the Apply Tools pane so you can add, remove, or review them in your budget at any time.
To create tools used in this pane see the Setup Tools section.
Access Apply Tools
The Tools Pane can be hidden or displayed by use of the Tools Switch.
The Tools Pane can be docked to the bottom of the screen or back to the right side using the green Dock down button in the pane header, or popped out into its own window (see Pop Out Applied Tools). When docked to the right you can view two tables of tools at once (for example, Fringes are usually shown in the top pane, and Groups in the bottom pane). When docked to the bottom you are limited to viewing one table of tools at a time.

When docked to the bottom, click the green Dock button again to return the Tools Pane to the right side. When using Split-Screen Mode, the tools will be forced to the bottom arrangement so as to view both Budgets and both Tools Panes side-by-side.

Pop Out Applied Tools
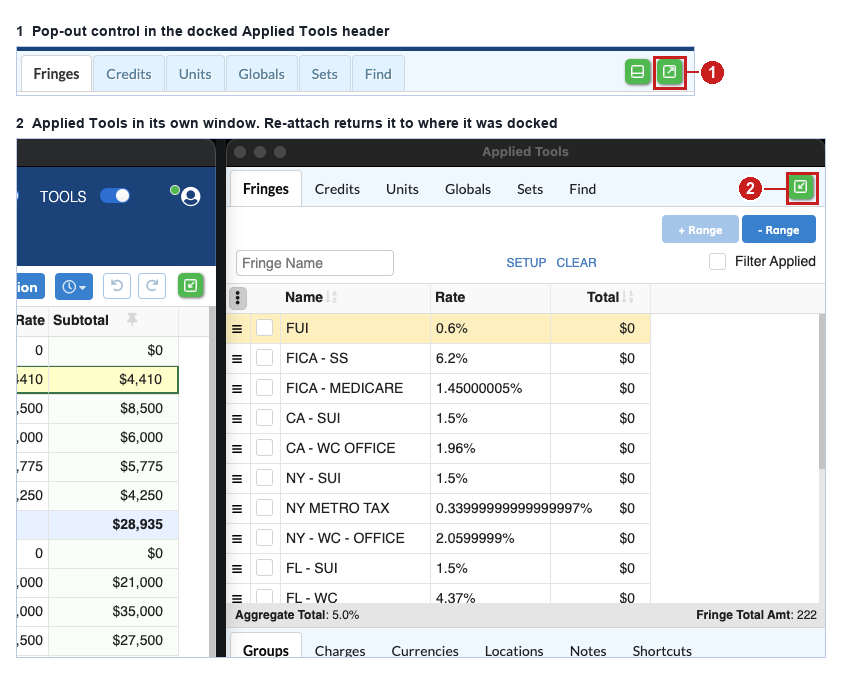
Docked to the right or the bottom, the Tools Pane takes rows away from your budget. You can move it into its own window and place it anywhere, including on a second monitor.
- Click the
Pop outbutton in the Tools Pane header - Move and resize the floating window as needed
- To return the pane, click
Re-attach Tools to the main windowin the floating window
The pane returns to the position it had before you popped it out.
Values in the floating window update as you edit the budget, on every tool tab. Fringes, for example, show for whichever line is selected, the same way they do in the docked pane.
Reorder Tool Tabs
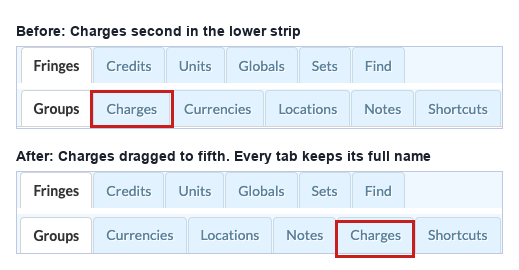
Tool tabs show their full names, such as Fringes, Credits, and Units. Drag them into the order you use most.
- Drag a tab left or right within its tab strip
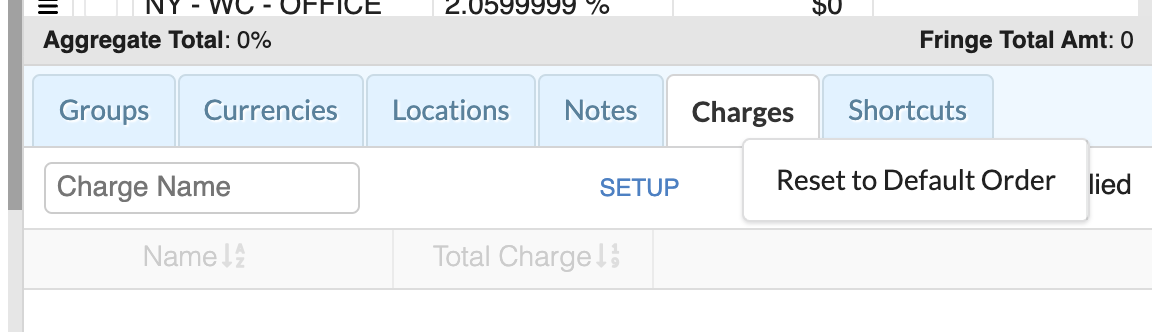
- Right-click a tab and select
Reset to Default Orderto return to the original order
When the pane is docked to the right it shows two tab strips, and a tab moves within its own strip only. Your tab order is kept when you close and reopen the budget.
Applying Tools
Each tool is used in your budget differently. Fringes and Groups are usually applied to selected lines, while Globals or Currencies will be typed in where needed.
See the individual pages for details on applying tools:
Sorting Apply Tools
Tools within a Category can be sorted by some of the column headers or in a custom order.
- Click a column header with the
A-Zmarker to reorder that table. - Click once on the header to order in ASCENDING order.
- Click again on the header to order in DESCENDING order.
- Click a third time on the header to view in your CUSTOM order.
- Use the drag handles to the left of each row to edit your custom order.
Note: The order you set for Tools in the Apply pane is not the same as the order in the Setup screen.

Apply Tools Columns
You can increase or decrease the size of the Tools Pane by dragging and dropping the left and bottom dividers.
Click the menu (three dot) button to the right of each tool's column header to select which columns to show.
If you add too many columns so you can't see the menu button, scroll the table to the right using the scroll bar at the bottom or by panning right with your trackpad.
