Sub-Budgets
The Sub-Budget workflow allows you to create filtered versions of your current budget for sharing, comparison, or scenario planning. It is a quick method to generate a new budget version without changing the original budget. Filter and choose what to include in a sub-budget.
For example, view a budget by isolating a specific group, currency, or location cost without altering the original budget.
A sub-budget is a fully functioning budget and can be edited, modified, and updated just as an original budget would be.
Note: Changes made to a sub-budget will not show in the original budget. Changes made to an original budget after a created sub-budget will not show in that previously made sub-budget.
Create Sub-Budget
You can start creating a Sub-budget by:
- Going to Open Budgets, select an existing Budget, and click the
Create Sub-Budgetbutton - Going to the budget window for any budget and click
File > Create Sub-Budgetin the application menu - Going to the budget window for any budget, click the
menubutton (three dots) in the Tab for that budget, and selectCreate Sub-Budget

Sub-Budget Workflow
Creating a Sub-Budget starts with the complete source budget. You will go through three steps to filter down what should be kept in the Sub-Budget.
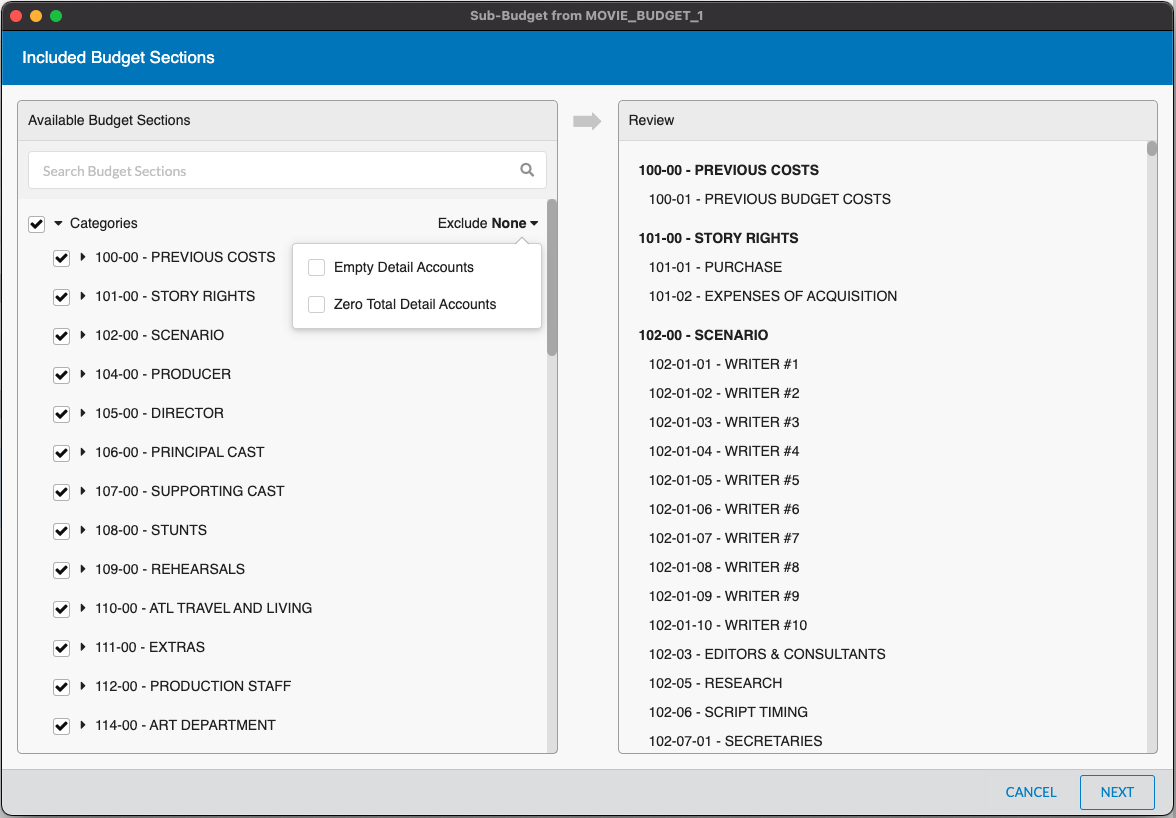
Step 1: Included Sections
Select which Categories and Accounts to include in your Sub-Budget.
- Click the Categories or Account Headers to open or close them
- Select the checkbox next to a Category or an Account to include it in the Sub-Budget
- Click the
Excludedrop down to:- Exclude any
Empty Detail Accounts(e.g., Accounts with no Detail lines) - Exclude any
Zero Total Detail Accounts(e.g., Accounts that have Detail lines, but have a 0 total at the Account level)
- Exclude any
The Review section on the right hand side shows you a preview of Accounts included in your Sub-Budget. Once you've made the Category and Account selections you'd like, click NEXT.
Note: Even if you select all Categories and Accounts here, the next section will apply further rules that may remove any of them from your Sub-Budget.
Step 2: Included Lines
Make selections for given tools (Groups, Locations, Currencies, etc.) to keep or remove lines tagged with those tools from the Sub-Budget.
By default, if you make no changes in this step, then all lines currently still in the budget (after Step 1) will remain in the budget.
To narrow down the remaining lines, select a tab for a given Tool and unselect options until the options you want to keep in the Sub-Budget remain.
For example, a common scenario would be to navigate to the Groups tab, uncheck the top checkbox next to Name (which unselects every group), uncheck Include Lines Without Groups, then check the one Group you do want in the Sub-Budget. The Sub-Budget will only contain lines from your original budget that were tagged with that selected Group.
Note: If a line is tagged with a tool that you marked to keep AND tagged with a tool you marked to remove, the line will be kept.
Multiple Selections for a Tool
Selecting more than one option within a given tool will keep all lines in the Sub-Budget that match any of the selected options in that tool.
For example, if you select two different Groups, the Sub-Budget will include all lines that are tagged with either or both of those Groups.
Selections Across Tools
If you make selections for more than one type of tool the system will find the overlap between those selections to decide what to keep in your Sub-Budget.
For example, you select only one specific Group and one specific Currency. In that case, the resulting Sub-Budget will contain lines that were tagged with that Group AND that Currency. It would not include lines that were tagged with that Group but a different Currency (and vice versa).
Include Lines Without...
Many of the tools have an option at the top to Include Lines Without... which decides if lines in your original budget that were not tagged with ANY of the options in that category should be included.
For example, you navigate to the Groups tab and uncheck Include Lines Without Groups. The Sub-Budget will be missing all lines that were not tagged with any Group.
Keep Excl Groups Checked
For the Groups tool tab you can select whether Excluded Groups (see Group Setup) should be kept checked no matter what. This is helpful if you want to uncheck "active" Groups in the table in one click but leave all Excluded Groups selected.
Step 3: Include Fringes & Notes
Your Sub-Budget will usually include all the tools, notes, and other details that your original budget had, even after filtering down to specific lines.
If you want to remove Fringes entirely from your Sub-Budget you can uncheck Include Fringes. This will not change the lines included in the Sub-Budget but will remove all Fringes from the Setup table and remove all Fringes from all lines (so budget totals may be changed). This can be useful to avoid over-sharing information about Fringe rates and totals in a Sub-Budget.
If you want to remove all Notes from the Sub-Budget you can uncheck Include Notes. This removes all Notes that may include assumptions or discussions not intended for the recipient of the Sub-Budget.
Create Budget
Once you've made all the selections you want, click Create Budget. The Sub-Budget will be created in the Project folder of its parent and the name will be automatically appended with "_1" (or another number).
You can rename the sub-budget as you wish and then open it to review the accounts, lines and tools already carried forward.